Chapter 4 — Surface Decoration
The Texture tab is where flat clay walls become studded, ribbed, fluted, or scaled. DigitalClay3D ships ~40 procedural patterns split into 1D (stripes that run around or up the body) and 2D (tessellations covering the surface in a grid). The Pattern Graph Editor lets you compose your own patterns from primitives.
1D vs 2D — the key distinction
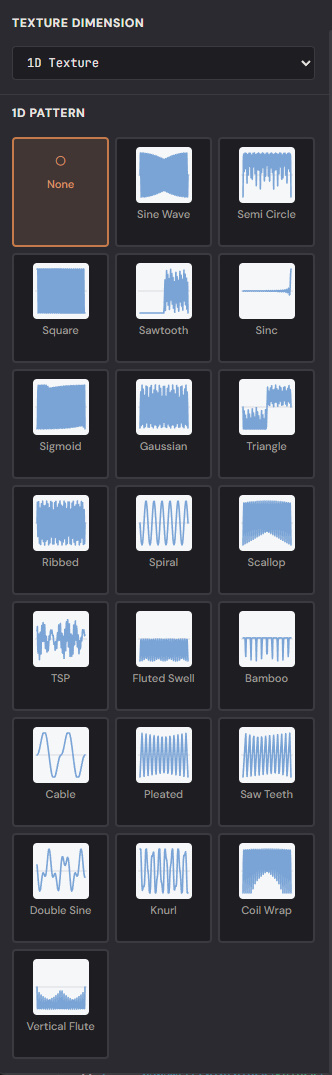
- 1D textures are waveforms. Sine, semi-circle, square, sawtooth, fluted swell, bamboo, cable, pleated, knurl. They repeat around the body (Horizontal direction) or up the body (Vertical direction). Cheap, smooth, great for ribbed-rim looks.
- 2D textures are tilings. Hexagonal cells, scales, spikes, pyramids, brick, herringbone, dragon-scale, voronoi. They cover the surface as a grid; the cell size is parameterised by Cells Around / Cells Tall or by direct mm spacing.
Pick the dimension via the dropdown at the top of the Texture tab.
Picking a pattern
The 2D catalog is large enough to spread across two halves of the panel (scroll the grid to see the second page in-app). The orange-rimmed cards in the lower half are the graph-driven presets — Twisted Spike, Helix Ribbon, Scattered Knobs, Onion Spire, Soft Flutes, Draped Folds, plus your own Custom Graph slot.
| 2D catalog | Screenshot |
|---|---|
| Top half — built-in tessellations | 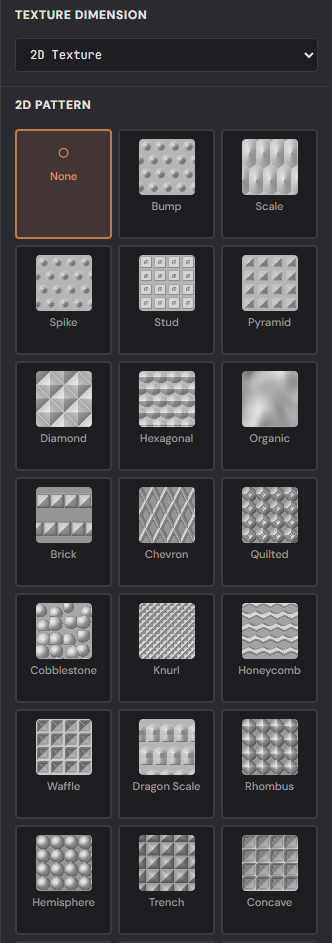 |
| Bottom half — organic + graph presets | 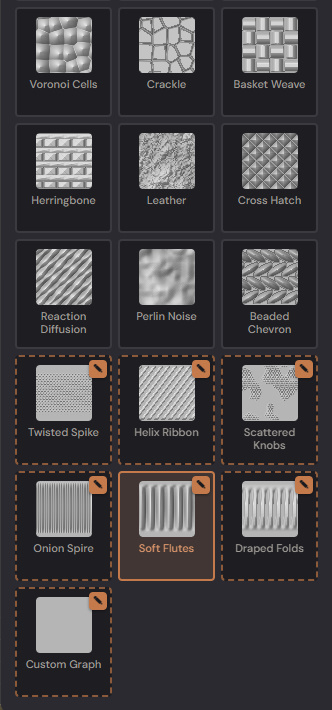 |
Each card shows a thumbnail rendered from the actual pattern math, so what you see in the grid is what you'll see on the vase. Click a card to apply it; the 3D viewport updates immediately. The orange-rimmed cards (Twisted Spike, Helix Ribbon, Scattered Knobs, Onion Spire, Soft Flutes, Draped Folds) are graph-driven presets — they're authored in the Pattern Graph Editor and can be customized further.
Tuning a pattern
Once a pattern is selected, the parameter panels below activate. The 1D and 2D pattern types expose slightly different knob sets — the 1D panel is a single column (waveform + amplitude + scope), the 2D panel fans out into stud / spike / cell-shape controls plus the shared scope band:
| Variant | Screenshot |
|---|---|
| 1D pattern parameters | 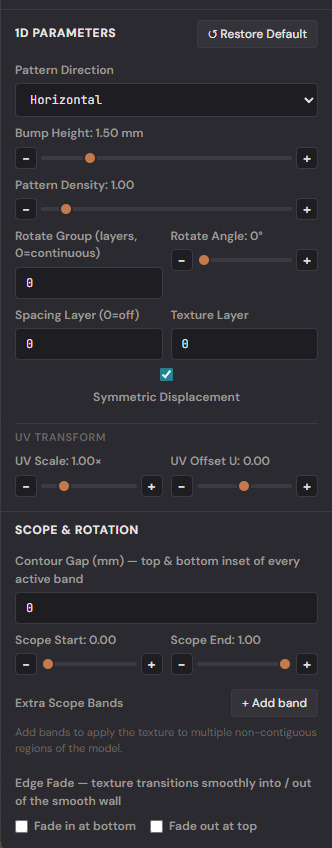 |
| 2D parameters — stud group | 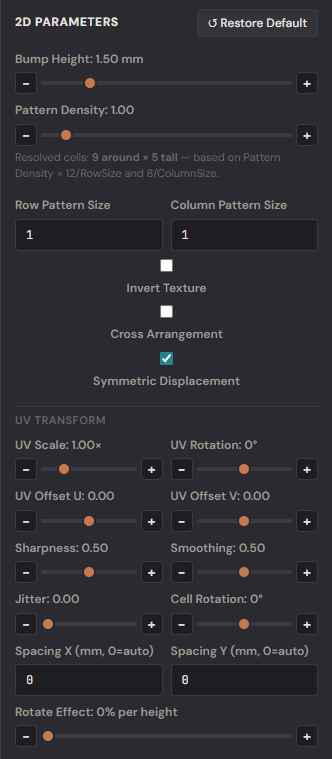 |
| 2D parameters — UV + scope | 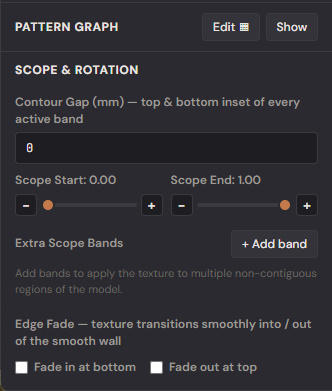 |
Common controls across all patterns:
- Texture Amplitude (mm) — how far the bumps push outward (or inward, with Inverted on). Typical range 0.5–4 mm.
- Cells Around / Cells Tall or Spacing X / Y (mm) — pattern density. Setting a positive Spacing in mm overrides the cell-count formula, useful for matching a real-world print pitch.
- Sharpness — for stud/spike/scale patterns: 0 = blunt dome, 1 = needle.
- Smoothing — softens the edges of each cell.
- Jitter — randomizes cell position. 0 = perfect grid, 1 = scatter.
- Cell Rotation° — twists each cell about its centre.
- Inverted — flips peaks and pits (cells become depressions).
- Symmetric Displacement — when on, peaks AND pits are emitted; when off (the v1 default), only outward bumps.
Scope (mask band) controls
You usually don't want texture covering the entire vase — the rim and foot look better smooth. The Scope controls let you confine texture to a vertical band:
- Scope Start / End — fractional height of the textured region (e.g. 0.10 → 0.92 keeps the bottom 10 % and top 8 % smooth).
- Fade In / Fade Out — soft transitions instead of hard edges.
- Fade Mm — the fade distance in real millimetres.
- Extra Bands — additional height bands where the texture also applies (for ribbed-collar / banded-belly looks).
Twist & UV transform
- Rotate Effect (deg/height) — continuous twist applied as the pattern climbs the body. The classic barley-twist.
- Rotate Group / Rotate Angle — discrete per-row rotation (every N
rows the pattern rotates by
RotateAngle). - UV Scale / Offset U / Offset V / UV Rotation — pan and rotate the pattern in texture space without changing the cell math.
The Pattern Graph Editor
The graph editor is a Grasshopper-style node canvas that authors texture graphs visually. Open it from Tools → 🧠 Pattern Graph Editor or click the ✎ badge on any graph-driven preset card.
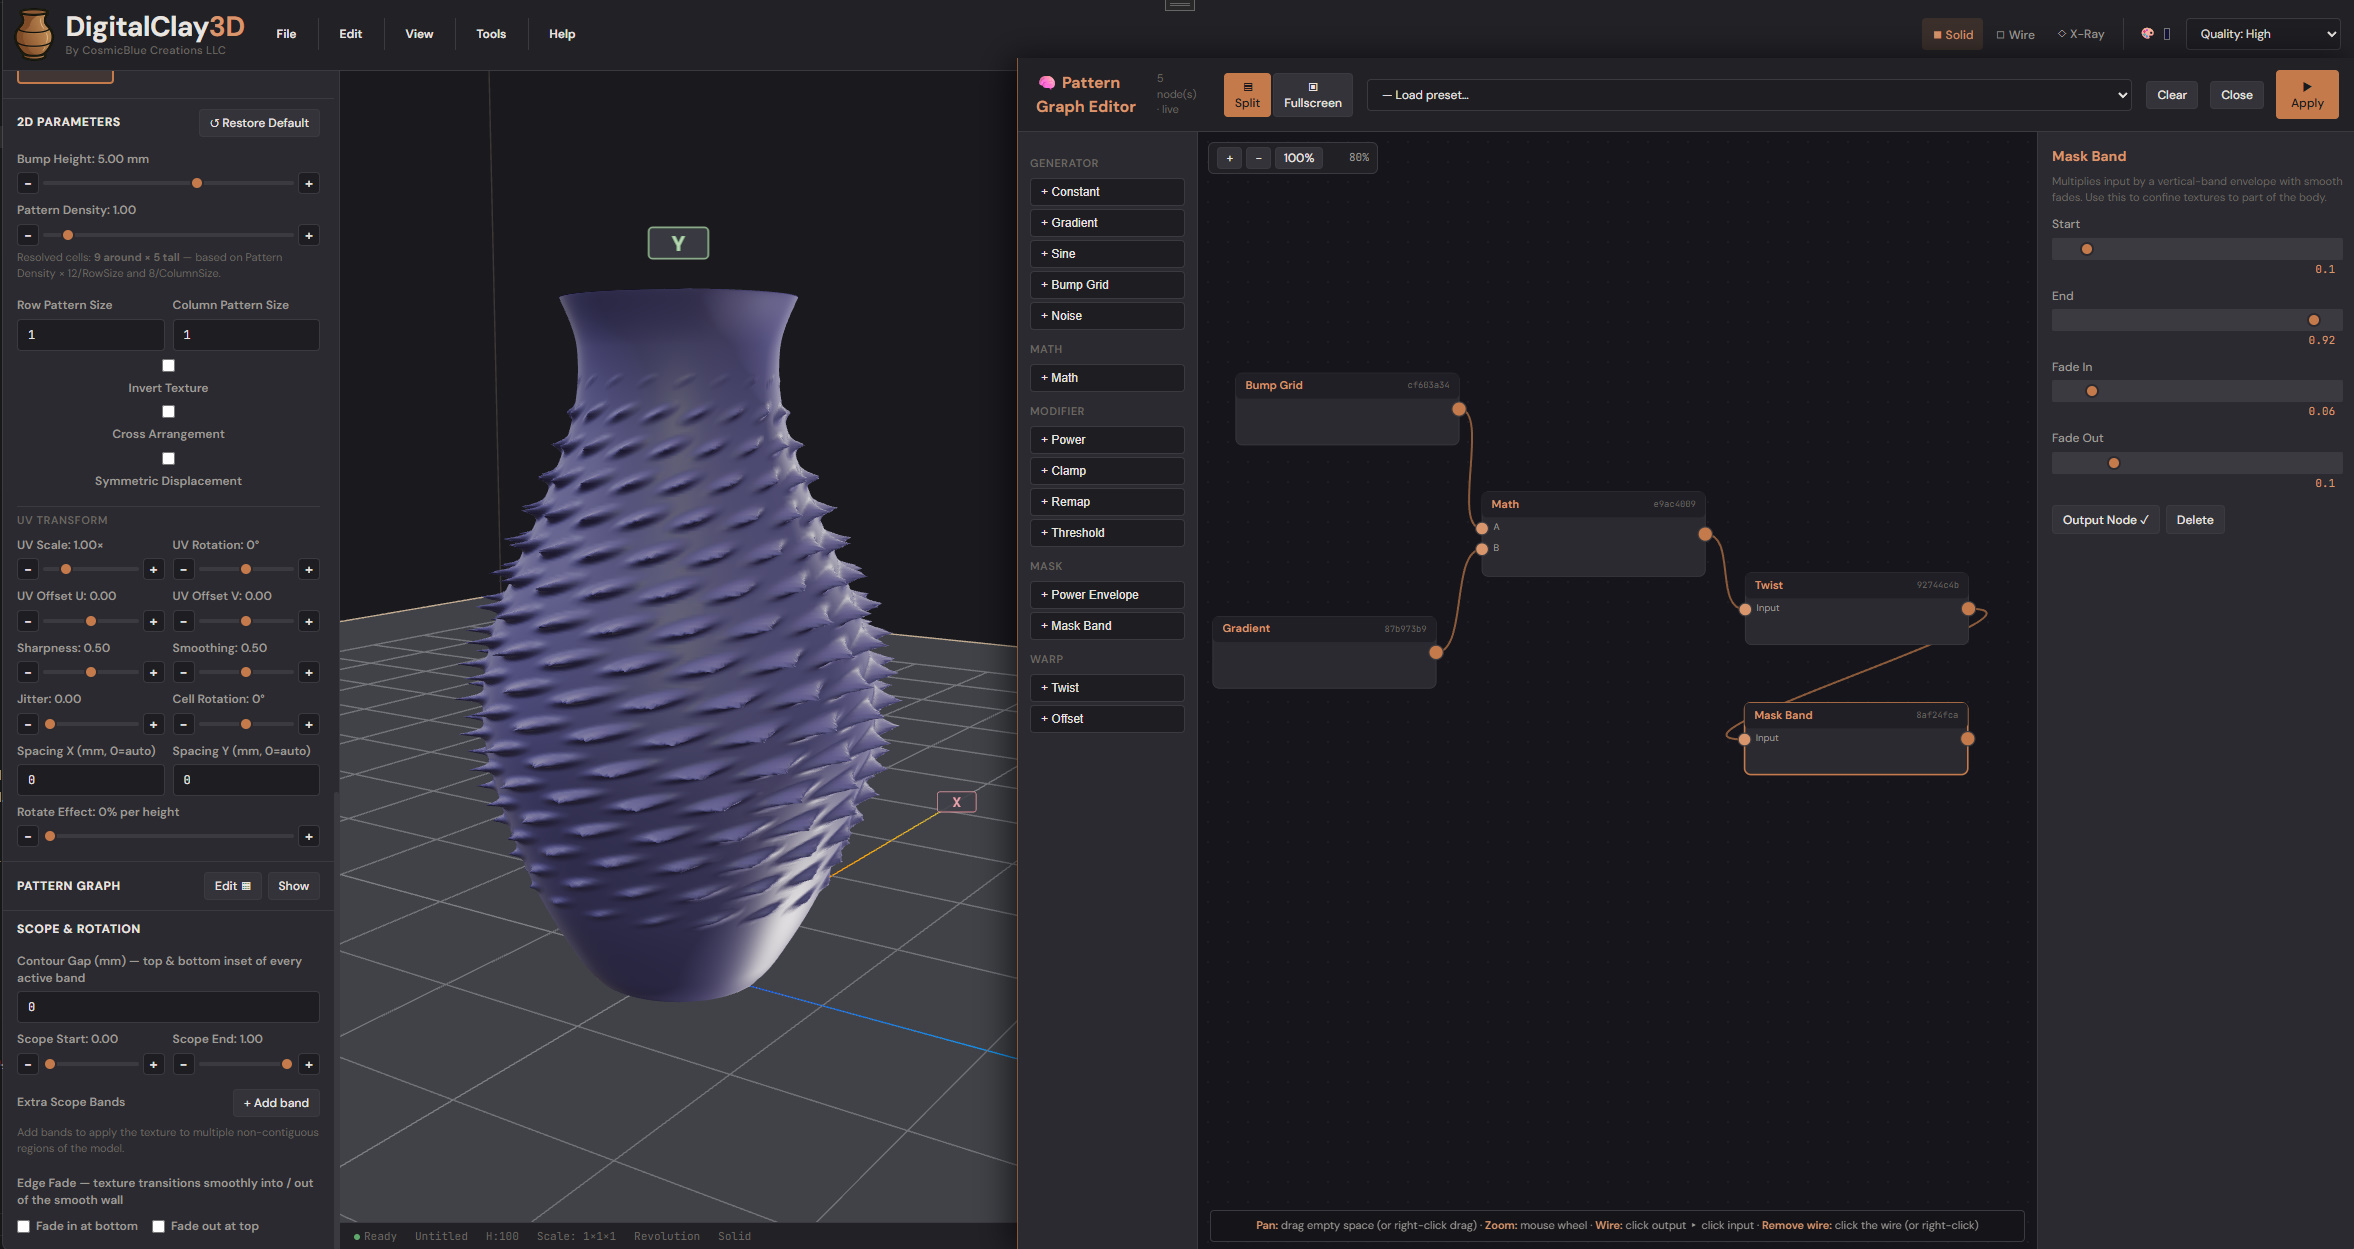
Layout (split mode by default):
- Left palette — every node type, grouped by category (Generator, Math, Modifier, Mask, Warp).
- Centre canvas — drag nodes to reposition; click sockets to wire; scroll to zoom; drag empty space to pan.
- Right inspector — parameters for the selected node.
Header buttons:
- Split / Fullscreen — split mode docks beside the viewport so you can see the 3D model live-update as you edit. Fullscreen takes the whole window.
- — Load preset… dropdown — drops in any of the six built-in preset graphs as a starting point.
- Clear — empty canvas.
- Close — close the editor (changes already saved via live preview).
- ▶ Apply — explicit re-render, useful when live preview lagged behind a fast sequence of edits.
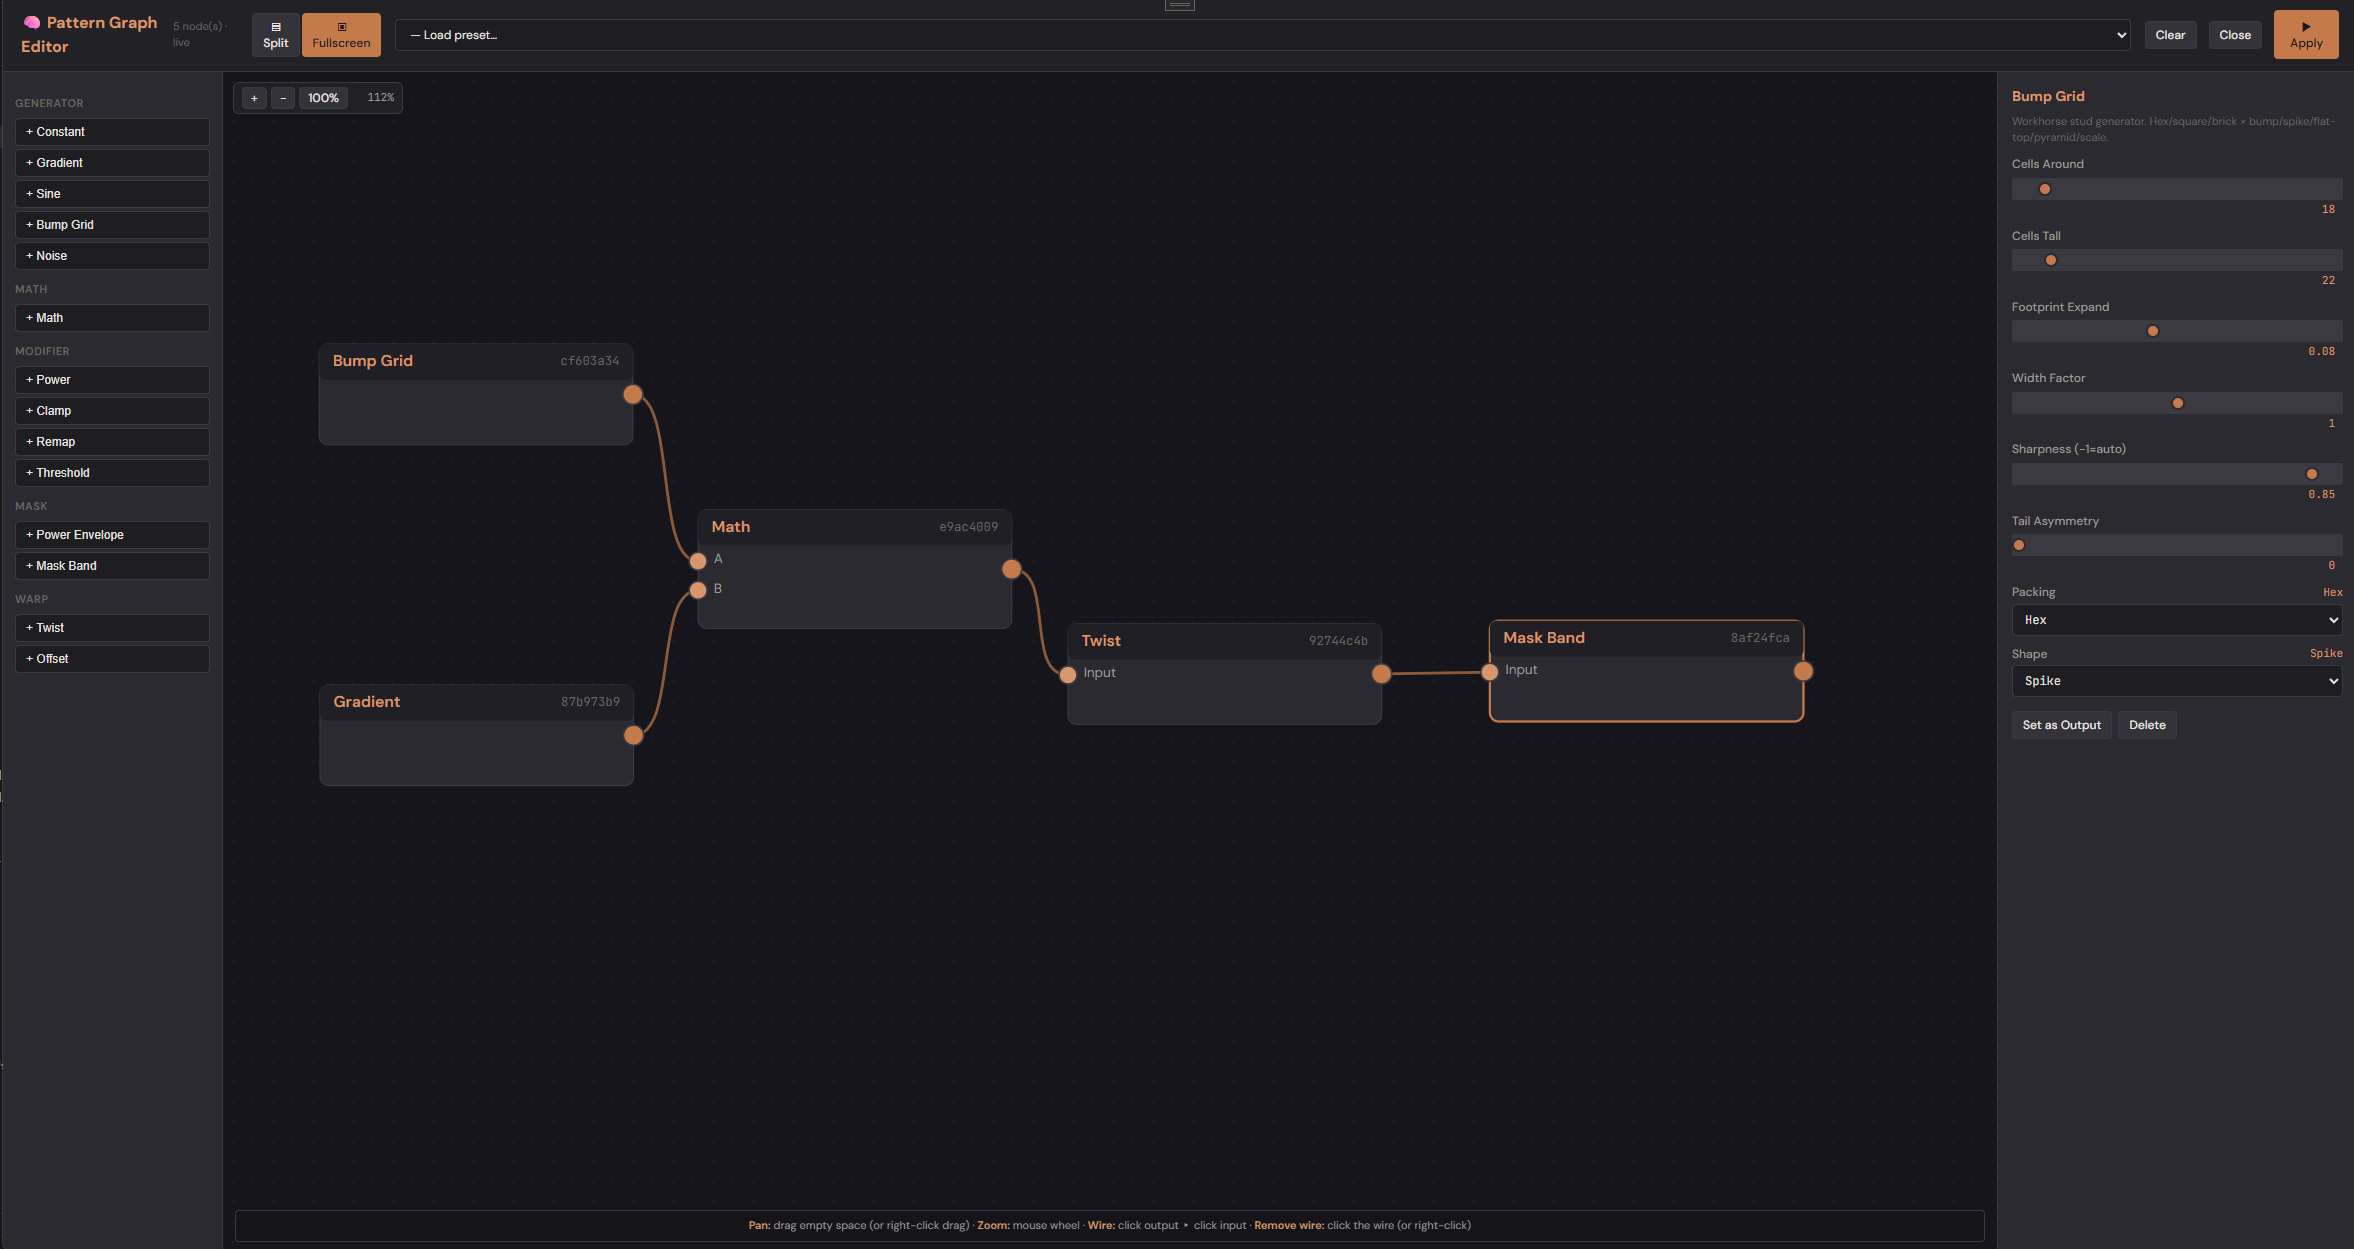
Wiring nodes
- Click a node's right-edge output socket. A pending wire follows the cursor.
- Click another node's left-edge input socket to complete the connection.
- The mesh re-renders immediately.
To disconnect: click the wire OR click the connected input socket OR right-click either the wire or socket. All three paths work.
The orange-bordered node is the graph's output (the root). Pick which node is the output via the inspector's Set as Output button.
Node categories
| Category | What's inside | Examples |
|---|---|---|
| Generator | Sources of signal — produce values without inputs. | Constant, Gradient, Sine, BumpGrid, Noise |
| Math | Combine two scalar inputs. | Add, Subtract, Multiply, Min, Max, Mix |
| Modifier | One-input transforms. | Power, Clamp, Remap, Threshold |
| Mask | Confine signal to a region. | MaskBand, PowerEnvelope |
| Warp | Bend the sampling space. | Twist, Offset |
Sine node — density-responsive
The Sine node has a Density-Responsive choice (true/false). When true, its frequency scales with the user's RowPatternSize / UvScale knobs at runtime — so a flute-based preset can let users dial in 6 vs 32 flutes via the standard Texture-tab density slider. The flute presets ship with this on; toggle it in the inspector if you want a fixed frequency.
Saving custom graphs
Every change in the editor streams to the model's UserGraphJson
field. When you close the editor (or click Apply), the active texture
becomes GraphCustom with your JSON applied. The graph travels with
the project file (.t3d) automatically.
To make a custom graph reusable across projects, save the project to the Library — the thumbnail captures the whole look so you can recall it with one click.
Tips
- Start with a preset — Twisted Spike or Onion Spire are good starting points. Tweak the inspector parameters before authoring from scratch.
- One node at a time — wire the graph end-to-end first with default values, see something render, then tune. Easier than authoring all parameters before checking the output.
- The cylinder seam — at theta=0 ≡ theta=2π, the pattern repeats. If you see a vertical line down the back of your model, your Cells Around count or your Sine Frequency needs to be an integer. The built-in patterns enforce this automatically; custom graphs need it explicit.
- Layer with effects — texture runs first, then a Surface Effect pass (Voronoi / lattice) layers on top. See Chapter 5.
What to read next
- Chapter 5 — Surface Effects for the Voronoi / lattice / cut-through pass.
- Chapter 8 — Export to get a textured mesh into STL/OBJ.